Wednesday, November 27, 2019

Pokémon Sword and Shield: Tips to Join Max Raid Battles

Pokémon Sword and Shield have recently added several new thrilling features and the Wild area is among them. It is an open land where Pokémon can roam around without worrying about anything. Also, the Wild area is a new home to Max Raid Battle, where a group of four trainers has to defeat a Dynamax or Gigantmax Pokémon.

If you successfully beat the opponent, then the game allows the gamers to catch it and move on to the uncharted path. So, join the Max Raid Battles now with your friends or NPCs. Here is how you can enter the battle and win using the tips listed below.
Effective Max Raid Battle Tips and Tricks
Are you struggling to win Max Raid Battles? Here are some helpful tips and tricks that will support to turn the tide of combat in your favor.
  • First of all, in-game items play an essential role in the Max Raid battle. So, make sure to earn enough currency to spend on these items.
  • Let the most reliable player use Dynamax and fight against your opponent.
  • Note, no need to worry if you do not catch the Pokémon, as you will still get a reward at the end.
  • The Max Raid Battles will become challenging even more as players move up the skill level. Try to start low and win battles accordingly.
Simple Guidance to Join Max Raid Battles
First and foremost, players have to find a Pokémon Den in order to enter Max Raid Battle that one can locate in the Wild area. In case, no Pokémon is available in the Den area, then the game also allows users to use a Wishing Piece to summon a Pokémon. You can buy these items at 3,000 each in the Wild Area from Watt Traders.
Additionally, make sure to buy one of the in-game item and use by throwing into a Pokémon Den to summon. However, you will not see which Pokémon will appear, but can quickly figure out the type of Pokémon based on weather. So, let’s begin with the steps that will help to join Max Raid Battles.
  • Head to the Wild Area and look for a Pokémon Den.
  • After locating a Pokémon Den, stand next to it and then tap A to interact.
  • By doing so, a page will show up along with a Pokémon’s silhouette.
  • Now, evaluate the type of Pokémon, although it’s difficult through a star rating.
  • Select one accordingly from the Boxes and proceed.
  • Note, Pokémon’s type and level are available on the screen’s right side for evaluation.
  • At last, press Confirm to verify the selected Pokémon that you want to fight.
  • Click on Ready to Battle until the green mark appears next to your name.
  • Then, choose Start Battle.
  • Fight hard trainers!
Alternatively, the game also allows players to fight against in-game friends. For that, look for the nearby friends by tapping on the “Invite Others” and then press “Ready to Battle” to initiate the combat process.
Besides that, if you have the desire to play the Max Raid Battles with NPCs, then choose the second option, i.e., “Do Not Invite Others.” It is advisable that not to use NPCs as they do not always select the best Pokémon for the raid battles. Also, always select “Re-enter Pokémon Den” if you are defeated in the game and try one time to win.
Considerable Facts to Know Once a Max Raid Battle Starts
Once the Max Raid Battle begins, things get slightly extreme as facing a monstrous Pokémon along with three other trainers is challenging. As we know, the game has a simple objective i.e., defeat the Pokémon using the power of Dynamax in combat. However, only one can use Dynamax out of four trainers, so choose your best man for the job and defeat the enemy.
Most importantly, each user gets a single chance to fight in a regular Pokémon battle. So, make sure to build an effective and efficient tactic to beat Gigantamax or Dynamax Pokémon before you reach your turn limit of combating. 
Other than that, once you have defeated the Gigantamax or Dynamax Pokémon, the game will only offer a single chance to catch the Pokémon. Also, the Pokémon will run away if it breaks out of your Poké Ball. So, give your best shot using Ultra ball or any other specific Poké Ball and catch it.
Gamers all around the world have been waiting for it to release for the last decade. Even though it is a prequel, it is Half-Life nonetheless. Moreover, a rumor surrounding Half-Life:3 has surfaced over the internet. Let us cross our finger and hope that the news turns out to be true.
Emily Johnson is a creative writer who has been writing blogs and articles about cyber security and the latest updates about the technology. She writes about the latest updates of office.com/setup and how it can be change the work experience of the users. Her articles has been published in many popular e-magazines, blogs and websites.

The Prequel Half-Life: Alyx Releasing in March 2020 as VR-Exclusive

Rewards, PC Requirements, and Half-Life:3 Rumor
Half-Life is officially back, but Valve has confirmed the title to be a prequel. After its predecessors Half-Life and Half-Life: 2 proved to be a massive hit, the fans were waiting for Half-Life:3, but a prequel is not half bad. Half-Life: Alyx is set between the timeline of Half-Life and Half-Life:2 while it will finally come in March 2020.; however, the game will be a VR-only.

Valve’s decision to keep the game VR-exclusive may put a dent on its sale, but the prequel is much-awaited by the gamers nonetheless. The story will be set in the timeline where Alyx Vance along with her father Eli is constructing the resistance against Combine’s alien occupying the Earth. The playable character is different this time around as we will play the character of Alyx Vance instead of Gordon Freeman.
The game will only be playable with motion controllers and VR headset, so you better be prepared to get used to those disembodied hands. Valve Index is not needed to play the game this time; however, the game will be free for anyone who owns a Valve Index. Sadly, Valve is not planning to bring Half-Life: Alyx for the traditional 2D screen.
Here is some information regarding the game:
  1. It will neither be an episodic-story nor a side-one. It will be the next part of Half-Life and will be around the same length as Half-Life:2.
  2. Even though the timeline is set before  Half-Life:2, it is sincerely suggested to finish the game beforehand. You will see why after you play the prequel.
The reason for the game being a VR-exclusive was addressed by Dario Casali (Valve developer.) Dario stated that the game was specifically designed to be played in VR and the offered details cannot possibly be apprehended with mere 2D gameplays. He went on to say that the more the game was explored, the more it became clear that the abundant opportunities it provides cannot be translated back to the keyboard. The players can track their hands separately from the head, along with the 3D space, simultaneously with moving and monitoring.
Alyx will be getting Gravity Gloves in the prequel rather than the usual Gravity Gun. A trailer was released for the game, and it looked like Half-Life: 2 but more appealing.
Rewards, Compatibility and Minimum Requirements
Here is everything you need to know about the compatibility and minimum requirements to run the game.
Compatible Headsets
  1. Linked Oculus Quest
  2. Windows Mixed Reality
  3. Valve Index
  4. Oculus Rift
  5. HTC Vive
Required Inputs
  1. Tracked Motion Controllers
  2. Playable while standing, room-scale, or sitting
Minimum System (PC) Specs
  1. Processor: Ryzen 5 1600/ Core i5-7500
  2. OS: Windows 10
  3. Graphics: GTX 1060 / RX 580 – 6GB VRAM
  4. Memory: 12 GB RAM
Even though a VR is needed to play the game, the specs are not too demanding. Still, these are the minimum requirements, and you should try to aim higher.
Rewards
If you get a Valve Index before 2019 ends, then there are additional Half-Life: Alyx rewards for you:
  1. Enjoy Half-Life: Alyx with SteamVR Home space
  2. Additional gun skins to enhance Alyx’s arsenal
  3. Dota 2 and Counter-Strike: Global Offensive content based on unique Half-Life: Alyx-theme
Gamers all around the world have been waiting for it to release for the last decade. Even though it is a prequel, it is Half-Life nonetheless. Moreover, a rumor surrounding Half-Life:3 has surfaced over the internet. Let us cross our finger and hope that the news turns out to be true.
Emily Johnson is a creative writer who has been writing blogs and articles about cyber security and the latest updates about the technology. She writes about the latest updates of norton.com/setup and how it can be change the work experience of the users. Her articles has been published in many popular e-magazines, blogs and websites.

How to Fix the Network Security Key Mismatch Error?

Network Security Key Mismatch Error is a common error on Windows computers connected to a wireless network. This error triggers when a user enters the password to connect to their wireless internet connection. However, this error means that the user has entered the wrong password, but many users have found this error even when the password is correct as well. Here is how to fix it: 

Fix 1: Changing the Currently Used Protocol Type 
  1. Head to the Network icon on the bottom-right corner of the desktop screen in the system tray. 
  2. Now click the Open Network and Sharing Center option. This will open the Network and Sharing Center window for you. Alternatively, you can also open this by heading to Control Panel and then clicking on the View Network Status and tasks option. 
  3. Once the Network and Sharing Center appears on the screen, press the Manage wireless networks option situated on the left navigation pane. 
  4. Find the network-facing Network Security Key Mismatch Error message, and you will be able to spot it easily. 
  5. Make a left click on that, and then see its Security type at the information bar located beneath.
  6. Hit the Remove option to forget this network from your device, and this will remove it entirely. 
  7. Now head to the Add option in the available menu and then select the Manually create a network profile option on the next screen of the Network and Sharing Center wizard. 
  8. In this window, you need to type the right Network name without making any errors as it could cause the issues. 
  9. Inside the Security type subheading, edit it from the default value. For instance, if it is selected as WEP, then choose it as WPA. If it is already selected by WPA, then you need to select the WPA2- Personal value.  
  10. After that, provide the right security key without making any errors. 
  11. Now unselect the option saying Hide Characters and check that you have entered the correct network key. 
  12. Select the option saying Start this connection automatically.
  13. Set the Encryption type as AES. 
  14. Press the Next button. 
  15. Follow the remainders and warnings mentioned on the screen before the process completes. 
See if you are now connected to the network or not. If this method failed to fix the Network Security Key Mismatch Error, then keep reading and see the next solution. 
 Fix 2: Reinstall Wireless Drivers
  1. Head to the Device Manager by searching for it on the Start Menu. 
  2. Once the Device Manager appears, find the wireless network device under the Network Adapter option. 
  3. Right-click on the wireless devices installed and then choose the Uninstall option. 
  4. Follow the onscreen prompts if there is any. 
  5. Now head to the Action tab at the top menu bar. 
  6. Select the Scan for hardware changes option. 
  7. The computer will reinstall the wireless drivers on its own. 
This will surely fix the Network Security Key Mismatch Error on your device. If this doesn’t work, then you can also try disabling the antivirus program that you have installed. Sometimes they are likely to disturb the connection via applying the network firewall. 
Emily Johnson is a creative writer who has been writing blogs and articles about cyber security and the latest updates about the technology. She writes about the latest updates of norton.com/setup and how it can be change the work experience of the users. Her articles has been published in many popular e-magazines, blogs and websites.
Monday, November 25, 2019

How to Install iPadOS 13.3 Developer -Beta-3 on-iPad?

The iPadOS 13.3 beta released on November 20, 201 and it is loaded with all-new features. It is easily available but it’s a bit complex to install it. In this blog, we will share all the information regarding the latest iPadOS 13.3 beta 3. If you are a developer and you are keen to test it, then follow this blog.

Latest in iPadOS 13.3
The third beta version of iPadOS 13.3 has been released. There are several new functions that have been added to this beta. If you are a developer and are waiting to test it, then follow the blog to get the steps to install it.
Archiving the Backup of your iPad
The first step for every upgrade or install process requires backup, so before proceeding further make sure you backup the iPad device you are using. Although the process for installing iPadOS 13.3 beta 3 to your iPad is very safe but it is still recommended to always do a backup before this kind of process. Here are the steps to backup your iPad.
  1. Sync the iPad either with Mac or Windows PC.
  2. iTunes will open automatically.
  3. Choose the iPad option from the Menu bar.
  4. Set the backup to the option of This Computer.
  5. Select the Backup option.
  6. Back up all the apps if it suggests.
  7. Tap Command and go for Preferences.
  8. Now, select the Devices option.
  9. Select your Backup and tap the option for Archive.
Installing the iPadOS beta via iTunes
  1. Open the developer.apple.com on Mac.
  2. Choose the option of”Discover”.
  3. Select any one operating systems options.
  4. Choose Download.
  5. Input all your Login details of your developer account.
  6. Download the Restore images from the IPadOS beta panel.
  7. Choose the desired IpadOS restore image for your device.
  8. Select Applications appearing on the top of beta software.
  9. Choose the Download option in Xcode11.
  10. Wait till the Xcode completes the downloading.
  11. Now, launch iTunes.
  12. Sync your iPad to the Mac.
  13. Choose the iPad icon \shown inside iTunes. Input the iPad password if it asks.
  14. Locate the Check for Update tab in the option key and select it.
  15. Tap on Downloads.
  16. Open the iPadOS restore image.
  17. Choose the Open option.
Installing the iPadOS beta via Developer Account
In order to proceed with this method, you need to have a developer account with Apple. You need to purchase this account from Apple.
With the Apple developer account, you can easily download iPadOS betas straightly to your iPad, no Mac, no other resources required. Follow these steps, if you want to install it this way:
  1. Open the developer.apple.com on your iPad.
  2. Select the “Discover” option.
  3. Choose any operating system button available at the top of the display screen.
  4. Then select the Download option.
  5. Input all your developer accounts details to further the login process.
  6. Move to the iPadOS 13 beta part and choose download.
  7. After this, the process will begin.
  8. Select Close.
  9. Launch the Settings.
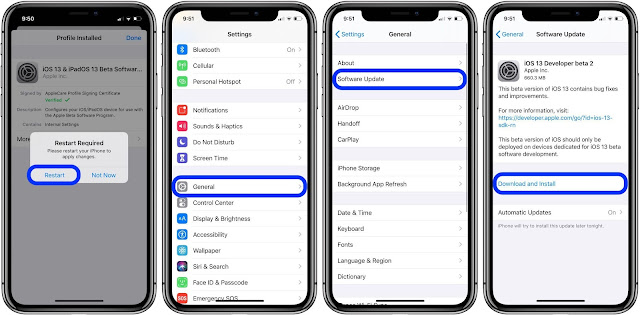
  10. Choose the Profile Downloaded option.
  11. Select Install, if asks for your Password input it.
  12. Tap the Restart to execute the changes to your iPad.
After you have created a developer account, you need to visit the software update section on the iPad. Follow below:
  1. Open the settings and go to the General option.
  2. Select the Software update.
  3. Select the Download and install option after the update shows on the screen.
  4. Input your iPad passcode.
  5. Select Agree for the Terms and Conditions of Apple.
  6. Once again you need to choose to Agree for the confirmation.
Let the process be complete, your iPad will restart a couple of times. Wait till it completes.
Starting  iPadOS  beta
After you have successfully installed the iPadOS on your iPad. There is a simple login procedure you have to follow. To login do:
  1. Select the Continue option.
  2. Input the password of our Apple ID. It will take a bit of time as the settings of the iCloud will update.
  3. Select the Get Started option.
Now you can test the iPadOS beta as it is successfully installed on your iPad.
Ashley Miller is a Mcafee product expert and has been working in the technology industry since 2002. As a technical expert, she has written technical blogs, manuals, white papers, and reviews for many websites such as mcafee.com/activate.

How to Fix Netflix Error NW-2-5?

The most popular streaming service throughout the world has led the showbiz business to a great extent. Netflix, the name remains trending in numerous discussions in every region of the world, although its growing demands increased its subscription as well as the strain on the app’s shoulders. The strain was intermittent by Network connectivity issues that the service faces nowadays. This Error is known to be the NW-2-5 Error and it signifies an issue that interrupts the streaming device to connect to Netflix. The devices most prone or facing this Error are smart TVs, PSs, and the Xbox.

There are several possible ways to fix this error, but some of them are a bit unsecured. In this workaround, we are sharing the most secure and easy steps to fix the NW-2-5 Error. Although the Error is occurring in several devices here, we are sharing the workaround for PlayStation, Xbox, and Xbox One.
Methods to Fix
If the error NW-2-5 keeps on bothering you, then there are few basic steps that can be used to fix it. The methods include checking the internet connection, whether the speed is appropriate for Netflix or not. The other way is to switch your wireless router with the wired one.
Checking the Internet Connectivity
  • First, go for the option of the network administrator and check that Netflix is not accidentally blocked.
  • Check the speed of your device network’s if it is slower than the usual speed, then switch the device towards other Networks.
  • To advance the checking, you can run a speed test on an internet-based site. There are several sites available on the internet for this purpose.
  • Now, reboot your device.
  • If your streaming device is at your home and you are using a home network, then perform an unplugging and a plugging task for your modem and router. This will execute a reboot process of your Network.
If any of these methods have not fixed issues regarding Netflix streaming, then try the fix down below.
Change the Wireless Router
It is stated by several home network users that the wireless router some time loses its compatibility with the modem. This results in network errors, so if you are using a wireless network and facing connectivity issues, then use an Ethernet cable to perform this task.
Below are the steps to execute this method:
  • You need to power off or switch your streaming device.
  • Now, connect the modem and the device by using Ethernet cable.
  • You should do unplugging the modem for around 30 seconds, then plug it again.
  • Restart the device and launch the Netflix.
  • Now, check if the issue persists or not.
Fixing the Netflix Error NW-2-5 on PlayStation
The necessary step for every troubleshooting process requires rebooting, so you should reboot your PlayStation. Another must-do step is to check whether the DNS settings are set correctly or not. Below are the settings:
  • Open the Main Menu and select the options for Settings.
  • Choose the option for Network Settings, then select the Internet Connection Settings.
  • Tap on the Custom option and choose the preferred Network you are using: Wireless or Wired.
Follow the steps to reset the settings for Wireless Network:
  1. Go to the option for WLAN.
  2. Now, select the Enter Manually option.
  3. You need to visit the IP address Setting at least three times.
  4. The settings of your Wireless Network will automatically reset back to the previous setting.
Follow the steps to reset the settings for Wired Network:
  1. Choose the Auto-Detect option to open Operation ode.
  2. To open the IP address settings, you need to select the Automatic option.
  3. Now, open the DNS Settings by a tap on the Automatic tab.
  4. Choose the option of Do not set to unveil the DHCP hostname.
  5. Set the MTU option from manual to Automatic.
  6. Now, go for Do not use the option to unveil the Proxy server.
  7. After all this, you need to enable the UPnP.
  8. Tap on the test the connection option.
Fixing the Netflix Error NW-2-5 on Xbox and Xbox one
To execute this method, you need to make a few changes to the DNS settings on your preferred device. Follow the steps below:
For Xbox
  1. Tap on the Guide button from your controllers; this will launch the Settings.
  2. Locate the System Settings, then go for the option of Network settings.
  3. Choose the preferred Network from the following options.
  4. Tap the option of Configure Network, then DNS settings.
  5. Toggle the settings to Automatic option.
  6. Reboot your Device.
For Xbox One
  1. Choose the menu on the controllers and then locate the option for settings.
  2. Open the option of All Settings, then go to Network after that choose the Network settings option.
  3. Now, you need to select the Advanced settings option.
  4. Choose the DNS settings and Select the option of Automatic.
  5. Reboot your device, make sure you saved all the changes before rebooting.
  6. Open the Netflix app and check if the issue persists or not.
Turning off the BT Parental Control to fix NW-2-5 Error
This alternative method is for those who are using BT or better known as an Internet Provider. If you want to execute or try this method to fix the NW-2-5 Error, then follow the following steps:
  1. Go to MY BT option.
  2. Enter the details into the login tab. The details must be provided to you by your BT provider.
  3. Hover down through the page and locate the My Extras option.
  4. Tap on the Personalize your settings tab.
  5. Choose the very next option appearing after BT Parental Controls.
  6. Turn off the BT Parental controls.
Ashley Miller is a Mcafee product expert and has been working in the technology industry since 2002. As a technical expert, she has written technical blogs, manuals, white papers, and reviews for many websites such as mcafee.com/activate.

How to Download Videos on Android in Disney+

Disney recently introduced Disney+ that offers an interesting collection of Movies and TV shows. On its launch day alone, it grossed over 10 million subscribers. The service provides original content based on the top-rated shows Star Wars, Marvel Universe. This is the subscription service that allows subscribers to watch movies and TV shows on demand. It includes all Disney media properties like Disney, Marvel, Pixar, National Geographic, and much more.

Disney+ app is the streaming service with thousands of different TV shows and movies. It needs an online connection; however, there may be users who don’t want to use their data when away from Wi-Fi. It’s not an issue as there is a download option available which allows you to download it quickly, be it movies, TV shows or individual episodes. The user must change the download quality from default to Medium or high when they start downloading.
If you are excited about your favorite TV shows and movies to stream it on Disney+, then you are on the right post. Follow the given directions to download Videos, movies, TV shows from Disney plus on Android.
How to change the download quality in Disney+
Follow the provided steps to improve the download quality in Disney+:
  1. Launch Disney+ app.
  2. Click the profile picture.
  3. Click App settings.
  4. Click Download Over Wi-Fi only to change settings to off.
  5. Select  Download Quality.
  6. Select the quality the user wants for download.
When the user has set the preferred video quality, then they can start downloading their favorite videos and TV shows.
Steps to download Shows
If you want to download videos, then you can follow the provided steps:
  1. Launch Disney+.
  2. Click a movie you wish to download.
  3. Click the download icon, and then Add to Watchlist.
  4. Click back arrow.
  5. Click on the TV show to download.
  6. Click on download to download the entire season.
The user can download as directed, all their favorite TV shows and movies. You cannot download extras, but all the episodes are available to watch it online or to download it directly.
How to handle downloads
Follow the offered steps to handle downloads:
  1. Launch Disney+.
  2. Click on Downloads.
  3. Click on shows you have downloaded.
  4. Click Edit to delete episodes.
  5. Click a checkbox to choose episodes you want to delete.
  6. Click select all to select all the episodes.
  7. Click on a trash can.
  8. Click on the phone icon.
  9. Click Remove Download to remove selected videos.
  10. If any video is downloading, then click Pause Download to hold it.
Users can use the option of batch delete, which helps in deleting all the episodes at one time to make space for new downloads.
Emily Johnson is a Norton product expert and has been working in the technology industry since 2002. As a technical expert, she has written technical blogs, manuals, white papers, and reviews for many websites such as office.com/setup.

Wednesday, November 20, 2019

Avengers Endgame’s Deleted Scene Uncovers Another Death of Black Widow

A deleted scene of Avengers Endgame tells another way of Black Window’s parting Hawkeye. Viewers say that this one is even worse than what we all saw in the movie when she sacrificed herself for the soul stone. During the scene where Black Widow and Hawkeye traveled to Vormir to retrieve the Soul stone, everybody knew that one of them would have to sacrifice their life. 

We saw them fighting to save one another’s life, but finally, we saw Black Windows falling from the cliff and then Hawkeye with the Soul Stone. In the movie, we saw everyone regretting Black Widow’s death, especially Hulk, who was more attached to her. Hulk even shows his disappointment on the screen by throwing the massive stone chair high in the air.
In a new unrevealed deleted scene, there is an alternate ending of Natasha Romanoff’s death. The deleted scene starts in the same way as the final movie shows, but when the time begins to bargain about who will die, immediately Thanos and his children land on Vormir on the same spot where they were discussing who will jump from the cliff. Thanos and his forces pin them both on the ground on a gunpoint, but Natasha decides to fightback alone in Superman-style. 
However, against multiple alien opponents, she gets shot by alien’s projectiles and ends up with critical wounds. She almost dies with those attacks, and then she crawls the way to the cliff and falls off from there. This unlocks the chances of survival for Clint as he instantly reaches the place where Soul stone was kept safe.
The ending scene was not adequately shot, and there were unfinished animation and CGItoo. The Thanos’s forces, including Chitauri soldiers, look horrible in the scene as they partially appeared like humans because it was an underdevelopment clip.
Many Marvel fans are reacting in distaste after watching this scene as some people aren’t already happy with the Marvel showing the unnecessary death of Black Window. The controversy for the movie is rising even more after watching this deleted scene. Several fans are saying that it was the right decision to remove this scene from the film. 
In the official movie, we saw Thanos capturing and imprisoning future Nebula on the Orb planet where the Power Stone was kept. This was a better decision to put Thanos in the front of Nebula since she interconnected with her alternate past 2014 version. 
Emily Johnson is a Norton product expert and has been working in the technology industry since 2002. As a technical expert, she has written technical blogs, manuals, white papers, and reviews for many websites such as norton.com/setup.

Monday, November 18, 2019

Where to Find Every Cameo in Death Stranding?

There is no doubt that the Death Stranding game is full of surprises and offers numerous jaw-breaking features. To make the game more exciting, a number of celebrities are appearing in the game like Lea Seydoux, Norman Reedus, Mads Mikkelsen, and more. 

Additionally, Kojima 3D-scanned these personalities and  come into view as an in-game character called Preppers. These people are waiting for cargo and living alone with their families in the bunkers. Conversely, you will face problem in locating preppers as some of them are hard to find. For that, all you need to do is check the underneath information and meet them conveniently.
Death Stranding Eastern Region Cameos
In the eastern region, there are a couple of cameos present that are hard to miss out. You can easily find them, whereas sometimes it is tricky to locate Lunden’s fan. Give your best shot and meet these Death Stranding cameos.
  • Geoff Keighley – Ludens Fan: You will meet Geoff Keighley as the first prepper in Death Stranding and also known as the Ludens Fan. He will provide information through emails about Luden’s figures and the new world.
  • Daichi Miura- Musician: In the real-life, Daichi Miura is a Japanese songwriter and singer of 1997’s band called Folder. Deliver enough cargo to form a relationship and attain a harmonica.
Death Stranding Central Region Cameos
Here are the rest of the cameos that gamers will find in the Central Region of the game.
  • Junji Ito – Engineer: A legendary Japanese horror manga artist i.e., Junji Ito, The Engineer. You can locate him in the opening plains of the central region.
  • Jordan Vogt Roberts- Film Director: The famous Kong: Skull Islands movie director Jordan V Roberts’s appearance is not surprising as he and Kojima are friends.
  • Edgar Wright – Thomas Southerland: To meet him, you need to reach Lake Knot City’s distribution center. In real life, he is the director of the movie Baby Driver.
  • Hirokazu Hamamura – Collector: A former Famitsu chief editor Hirokazu Hamamura obsessed with finding and collecting old video games in Death Stranding.
  • Alex Weatherstone – Errolson Hugh: The man who is responsible for managing Weather Station in the game. In reality, he’s an ACRONYM Canadian designer, Errolson Hugh.
  • Conan O’Brien – The Wandering MC: Find the abandoned or stuck trucks in the bottom of a steep dip and attain an otter hood. However, this hood will affect Sam’s movement in the water.
  • Veteran Porter – Sam Lake: You will meet the Veteran Porter at the edge of the mountain’s southern part of the central region.
  • Tommy Wirkola – Phillip North: The director of Witch Hunter movie lending his face as the leader of Mountain Knot city, Phillip North.
  • Manabu Makime – Novelist’s Son: A Japanese novelist appears in Death Stranding, and you will locate him at the south of the Distribution Centre.  
Ashley Miller is a Mcafee product expert and has been working in the technology industry since 2002. As a technical expert, she has written technical blogs, manuals, white papers, and reviews for many websites such as mcafee.com/activate.

Wednesday, November 13, 2019

How to Fix Windows 10 Update Error Code 0x80070002 ?

Updating your OS to get Windows 10 on your system is a good start; however, there are issues that can hinder you from taking full advantage of it. The process may start loading and then freeze suddenly displaying an error code 0x80070002. It slows down the system, and after that, it stops working. Every time it will show errors that can create problems, and you may get stuck in your work because of the slow processing.

Windows 10 update Microsoft has officially confirmed this error and provided fixes. However, the causes behind such issues is not confirmed yet.
You can take various steps to fix these bugs. Simply follow through the article, and fix the issue.
How to fix Windows 10 Update Error 0x80070002 ?
If you want to fix such bugs, then you can follow the provided steps:
Stop Windows Update Service
  1. Tap on Win key and enter the Administrative Tool.
  2. Choose the first option from the results.
  3. Then click twice on the Services.
  4. If the user receives a confirmation window, then input the administrator password to continue.
  5. Tap the Name column to sort out the names in overturning the order.
  6. Search Windows Update and right-click on it.
  7. Then choose Stop.
Remove temporary update files
  1. Tap on Win key and input File Explorer.
  2. Tap on it to open. Double-click on the hard disk that includes Window installer.
  3. Search Windows folder.
  4. Double-click on it and then erase all.
  5. Enter the administrator password again.
  6. Return to Software Distribution and then download subfolder on it.
  7. Erase the complete files from here too.
Revive the Windows Update Service
  1. Tap Win key and Administrative input tools.
  2. Locate Services option and then double-click on it.
  3. Input the Administrative password and then continue.
  4. Tap the Name column to sort out the names to reverse order.
  5. Locate Windows Update, right-click on it, and then choose start.
Check date and time
  1. Go to Control Panel.
  2. Choose Clock, Language, and Region option.
  3. Choose the Change Settings option.
  4. Put a mark on Synchronize with a net time server.
  5. Choose Update.
  6. Pick OK and shut down the window.
  7. Reboot your PC.
  8. Then check whether the date and time are correctly set or not.
Identify the reason automatically
If the above methods do not work, then the user should execute a scan through a registry cleaner like Reimage. Windows registry is a significant issue that often causes errors and other difficulties.
Emily Johnson is a Norton product expert and has been working in the technology industry since 2002. As a technical expert, she has written technical blogs, manuals, white papers, and reviews for many websites such as norton.com/setup.

How to Download and Install iPad OS 13.2.2 on iPad

Apple has introduced iPad OS 13.2.2 that packs the most recent privacy settings for Siri; the ability of Siri to announce received Text messages to others. The iPadOS 13.2.2 updates are accessible on the settings app. This focus on updates and bug fixes for issues will offer performance improvements that were not tackled in iOS 13.2. According to Apple’s discharge notes, the update fixes every recent problem the users had faced. This includes the error where the apps in the background were unexpectedly closing. This led to background apps bracing more frequently than usual. 

After the release of iOS 13.2 at the end of October, Apple has stopped signing for iOS 13.1.3 and 13.1.2. The latest iOS version, that released alongside iPadOS 13.2, supports Apple’s new noise cancellation earbuds i.e., Air Pods Pro. Additionally, the current version includes:
  1. Profound Fusion for iPhone 11 and 11 Pro
  2. Home Kit Secure Video
  3. An opt-in or out setting of Siri grading program
  4. A set of 70 new emoji characters
With the upgrade, you can no longer access the older version iOS 13.1.2 or 13.1.3 from the Apple servers. Also, to protect users, Apple ceased signing after the launch in part to stop them from taking the benefit of newly discovered bugs. Most importantly, by discontinuing the download of the older version, users get to access feature-rich software. 
Other than that, the best version of iOS 13.3 is currently under testing that offers fixes to the minor bugs and the platform as well. However, some people reported system management problems that aggressively shut down the applications. So, it is better to update your current version into the latest one, which will resolve the issue conveniently.
How to install iPad OS 13.1 using the software update
Go through the given steps to install iPad OS 13.1 via iPad:
  1. Ensure that you have created a recent icloud backup.
  2. Open Settings.
  3. Click on General.
  4. Click Software update.
  5. Click Download and install.
  6. Input passcode, if needed.
  7. Click Agree to the terms and conditions.
  8. Click Agree again.
Then the download will start automatically.
How to install iPadOS 13.1 using iTunes on Windows PC or Mac.
Ensure that you have a new iTunes backup. You need to encrypt your data and password to preserve them.
  1. Open iTunes on Window PC or Mac
  2. Plug iPad, iPhone, iPod touch in via USB to 30 pin Dock cable or Lightning.
  3. Tap on the device to go to the device tab option.
  4. Tap on Check for the Update.
  5. Tap Download and Update.
  6. Click on Agree to the terms and conditions.
  7. Input the Passcode on your iPad or iPhone.
Emily Johnson is a Norton product expert and has been working in the technology industry since 2002. As a technical expert, she has written technical blogs, manuals, white papers, and reviews for many websites such as norton.com/setup.

Thursday, November 7, 2019

How to Solve Issues on Windows 10 with Local Account

Windows 10 is a well-designed OS and the chances of it failing are pretty low. However, there are instances that the OS might face some issues as well. Issues in accessing the apps, services, download updates, and search bar not working correctly can happen from time to time on Windows 10. You can avoid these issues easily by using a local account. Here are the steps to can easily create a local account and solve issues on window 10. Ensure to follow the steps carefully:
How to Make a Local Account on windows 10

  1. Press the Settings button.
  2. Tap on the account option.
  3. Tap on Family & other users.
  4. Now, Tap on Add someone else to this PC button.
  5. Tap on I don’t have this person’s sign-in information button.
  6. Click on Add a user without a Microsoft account button.
  7. Create a Short Name for the account.
  8. Choose a Password.
  9. Tap on the Next button.
  10. Now, select the new account option.
  11. Tap on the Change account type button.
  12. Set the account type to the Administrator option.
  13. Tap on the Ok button.
  14. Restart your device.
    How to Solve Issues Using a Local Administrator Account
    If you want to resolve issues on windows 10 using a local account, then follow these steps:
  15. Tap on the new administrator account option from the lock screen.
  16. Tap on the Sign-in option.
  17. Select the privacy settings.
  18. Tap on the Accept option.
  19. Confirm whether you are still facing the problem or not.
    In case if there is no problem in a new account, then the issue must be from a previous profile or due to misconfiguration.
    How to Move to a New Account on Windows 10
    If you want to move to a new account, follow these steps:
    How to Transfer a File to a New Account
  20. Select the File Explorer and open it.
  21. Open This PC.
  22. Open drive C.
  23. Double-tap on the Users folder.
  24. Double-tap to open the old profile folder.
  25. If any permission warning occurs on your screen, then tap on the Continue button.
  26. Now, open the Run command.
  27. Enter the following command (%homepath%), then press the Ok button.
  28. Hover the new profile folder to the left.
  29. Now, hover the old profile to the right.
  30. Select all option in the new profile window.
  31. Select the Delete button to remove the default folders.
  32. Now, in the Old profile folder, tap on Select all button.
  33. Press on the Delete button and delete all the default folders.
  34. Now, apply the Paste button in the new profile window situated on the left.
  35. Now, your files have transferred to the new account.
Emily Johnson is a Norton product expert and has been working in the technology industry since 2002. As a technical expert, she has written technical blogs, manuals, white papers, and reviews for many websites such as norton.com/setup.

How to Modify the Default Font on Microsoft Word?

When you open a new blank document in MS Word, you can see that the app automatically set to ‘Calibri’ or ‘Times New Roman’ languages font...