Thursday, February 27, 2020

How to Enable or Disable Intel TSX in Windows 10

Before going into the in-depth analysis of enabling or disabling Intel TSX in Windows 10, we have to understand what exactly is Intel TSX and how it supports the Windows 10. However, if the users are interested to know about the procedure to enable or disable the Intel  TSX in windows 10 then they can go through the full detail given in the post that will help the users to enable or disable the Intel TSX by using registry settings. The Intel TSX could be termed as the extension to the instructions set architecture of x86.

It amplifies and adds to the memory support in the form of hardware transactional by amplifying the implementation of software that is multi-threaded through lock elision. The TSX can provide more than 40% faster execution of applications in specified workloads and can perform more than 4 to 5 times database transactions per second. It was introduced by Intel in the year 2013 which was based on the Intel microprocessors having Haswell microarchitecture. The Transactional Synchronization Extensions introduced by Intel perform the serialization only when it required and makes sure whether the threads need serialization through the critical sections of lock protected by allowing the processor to determine dynamically.
Intel TSX uses two interfaces of Software to specify the regions of code for performing the transactional execution. These two interfaces include Hardware Lock Elision and Restricted Transactional Memory.
Hardware Lock Elision
HLE could be defined as the instruction set having the composition of RELEASE prefixes and XACQUIRE which is legacy compatible and can specify the transactional regions. It is for the programmers who wanted to run software which is HLE enabled on legacy hardware along with taking the advantages of HLE supporting hardware of new lock elision capabilities. The XACQUIRE prefix is used by the programmers in front of the instruction set which is protecting the critical sections with the use of acquiring the lock. The XRELEASE prefix is used by the programmers to release the lock which is protecting the critical sections and available in front of the instruction set.
Restricted Transactional Memory
Restricted Transactional Memory can be defined as the new set instructions added to the interface having the composition of XBEGIN , XEND and the instructions having XABORT. The instructions have designed in such a way so that the programmers could define the regions of transactional code more flexibly. It is for those programmers who wanted a more flexible interface for performing the transactional execution of hardware.
Steps to Disable or Enable Intel TSX capability in Windows 10
  • The users can disable the Intel TSX capability in windows 10 by using the registry settings and for this, they will require to launch the prompt command in an elevated way.
  • First of you will need to click on the Start button and then type the CMD along with pressing the keys as such CTRL+SHIFT+ENTER KEY simultaneously.
  • After then, you will be required to copy and then paste the below-given command and then press down the Enter button.
reg add “HKEY_LOCAL_MACHINE\SYSTEM\CurrentControlSet\Control\Session Manager\Kernel” /v DisableTsx /t REG_DWORD /d 1 /f
  • After then, the users will need to restart their computers so that the modifications could become visible.
  • If the users want to enable Intel TSX by using a registry setting, then they can launch the prompt command in an elevated mode and further copy and paste the below-given commands. After giving the command you have to tap the enter button.
reg add “HKEY_LOCAL_MACHINE\SYSTEM\CurrentControlSet\Control\Session Manager\Kernel” /v DisableTsx /t REG_DWORD /d 0 /f
  • Once again the users will need to restart their computer to see if the changes have taken place.
Emily Johnson is a creative person who has been writing blogs and articles about cybersecurity. He writes about the latest updates regarding mcafee.com/activate and how it can improve the work experience of users. His articles have been published in many popular e-magazines, blogs, and websites.

Wednesday, February 26, 2020

How to Lock Down Your Amazon Account

Protecting and securing your Amazon account is a straightforward task, and one should take time to do it. An account has the treasure of personal details from debit or credit card to the address and the information related to friends and loved ones the entire information that any cyber theft want to access. Take some time to audit the personal information using the more protected password and allow the more layer of protection for the account. If you need to lock down the Amazon account, then this post is useful for you. Keep on reading to follow the instructions.

Double Check the Personal Information
Firstly ensure that the details linked to the Amazon account recent. Navigate to the page and log in to the account. Next, tap on login and security and verify the email and mobile number are correct. If anyone tries to access the account and modify the security settings, Amazon will send the mail to ensure that you are the one who is making the changes. Having the mobile number linked to the account will work as the backup method to get the onetime passcode.
Apply the Secure Password
After updating the details, then you need a tough password. If you use a password manager that makes, reminds, and also type passwords for you. This is what everyone must do, mostly with amount of violation, leaks, or the protection problems that occur every time. The important thing that you must not do is use the password to various accounts. This will leave all your accounts in danger. As you have determined on the password manager
If you want to apply the secure password, then you can follow the provided steps:
  1. Tap on Edit option beside the password box to change the Amazon password in Login and Security menu.
  2. Type the recent password.
  3. Copy and paste the new, any random password from the password manager.
  4. Hit the Save changes option.
Switch on the 2 Step Verification
Other importance of applying password managers that they save a one-time password, which needs to apply 2 step verification. You may insert the extra layer of protection to the Amazon account by switching on 2SV, then you need to add the password following the temporary code, which will be available through text to the device or shown in-app. Without using the app and the code, you or nobody will access the account.
If you want to switch on the 2 step verification, then abide by the given steps:
  1. Switch on the 2 step verification by navigating to log in and security menu of the Amazon account.
  2. Tap on Edit option beside the 2SV settings.
  3. Hit the Get started option.
  4. You will then get 2 choices to get OTP codes: Mobile number, Authenticator app.
On the mobile number means that you will get the text message with the code when you sign in to the Amazon account. Similarly, the Authenticator app allows you to access code in a password manager. The devoted authenticator app, including Google Authenticator. We suggest you use the app. It is extra protected then getting 2SV codes through text because of the increase of SIM swap crimes that lets people control your mobile number with small efforts.
If you wish to switch on the 2 step verification, then pursue the given instructions:
  1. Tap on the Authenticator app.
  2. Scan the QR code by using the preferred app.
  3. App will display the 6 digit code, type it on the website.
  4. Press the Verify OTP option.
  5. Hit the Continue option.
  6. Tap on Got it button.
  7. Switch on the 2 step verification.
The page will walk through the procedure for log into devices, including Kindle, which will not be able to show the OTP prompt. Rather you have to type the password using the OTP code to log in.
Emily Johnson is a creative person who has been writing blogs and articles about cybersecurity. She writes about the latest updates regarding mcafee.com/activate and how it can improve the work experience of users. Her articles have been published in many popular e-magazines, blogs, and websites.

How to Find Henchmen in Fortnite Chapter 2 Season 2?

The Fortnite Chapter 2 Season 2 has finally arrived and it began to produce heat among the gamers. Epic Games have stunned every one through the all-new world of Fortnite. Season 2 includes various new aspects that have totally altered the gaming experience of Fortnite. The all-new events alongside maps and cosmetics have added to the game.

Along with that, there are several new aspects added to the game that has made the Gameplay a bit intricate. The topmost among all of them is the Henchmen which is an all-new foe of the players that is ready to hinder the players in Brutus Challenge. The gamers have to accomplish the Brutus Challenge as it will provide them with lots of benefits that are beneficial for their game.
Brutus Challenge can only be accomplished when gamers need to know everything about Henchmen; Their location, appearance, and potency.  Below we have gathered specific workaround that will help out players to attain the information about Henchmen, including ways to slay them.
How to Find Henchmen?
The Henchmen are the minions in the Fortnite world that have been controlled by AI (Artificial Intelligence) to hinder the gamers from reaching to various newly added beneficial places and points. Gamers can quickly encounter them at The Yacht, the Grotto, the Rig, The Shark, and The Agency. These potent foes are spread in all regions of Fortnite, and they guarded vault that contains a plethora of loot. The gamers can easily know about these Henchmen as all of them are similar in appearance.
They wear a skull mask along with white suits. Alongside this, a mark will continuously appear on their head to notify the gamers about them. These marks keep on alter depending upon the mood of Henchmen; If they are feeling sad or acting suspiciously than the mark will appear as Yellow. Otherwise, there would be an exclamation mark on their head while they pertain to attack or alerted. Gamers will also know about them quickly after they encounter them because of Stealth.
How to Defeat Henchmen?
After the gamers have notified about the behavior of Henchmen through the mark that lies above their head, henchmen will attack the player and also beckon other Henchmen for help. The gamers have to be careful as Stealth attacks can slay them in one shot. Alongside this, gamers need to be fully prepared before thinking of accomplishing Henchmen and Brutus’ event.
Gamers need to be fully mobilized themselves with advance weapons and gears to face Henchmen. Once gamers adopt these steps, then they will probably thrash out the entire encounter Henchmen lineup easily.
The gamers have to face the Henchmen and Shadows in two of the Brutus challenges. These enemies will have easily vanished after gamers done more than 2000 damage to them. Alongside this, the players should also maintain at least 20m distance from Henchmen while attacking and dodging in the arena.
Conclusion
The subsequent blog obtains a workaround to brief the gamers about Fortnite all-new Season updates alongside ways to find and slain Henchmen. We assume that you will probably accomplish the Brutus event of Fortnite after attaining information through the blog. For any missing content about the topic from the blog is a clear made a mistake, and we are incredibly regretful for it.
Emily Johnson is a Microsoft product expert and has been working in the technology industry since 2002. As a technical expert, Emily has written technical blogs, manuals, white papers, and reviews for many websites such as office.com/setup.

Monday, February 24, 2020

How to Fix Windows Update Cannot Currently Check for Updates

Windows provides various features like updating, checking, and scanning for various updates. Apart from these features, Windows also check for recent updates as these updates fix various bugs and harmful issues while working on Windows 10. Updates are not for checking security attributes as they may affect the compatibility features and various stability settings.

Sometimes, users encounter various issues that prevent their Windows from checking recent updates. It might appear with error codes on your screen. Follow these instructions to fix the not checking updates issue on your device:
Running Windows Update Troubleshooting Program
Windows has a built-in troubleshooting program that enables users to check for recent updates and issues. After that, it fixes those issues on its own. To do so, follow these instructions:
  • First of all, hit the “Search” tab to activate and then enter “Troubleshoot” into the provided box.
  • A list of options will expand on your device, then hit the option troubleshooting.
  • After that, tap the option “Fix Problems with Windows Update,” followed by the Next tab.
  • Then, hit the “Restart” option to reboot your device and then try to download the recent updates.
Disabling Windows Update Feature
The “Control Panel” section allows the user to toggle between the options On and Off related to Windows Update. This feature fixes the issue of not checking updates. To apply this feature, pursue these instructions:
  • First of all, hit the “Windows Update” from the resulting options.
  • Then, tap the “Change Settings” option.
  • Navigate to “Important Updates” and then press the option “Never Check for Updates.”
  • After that, tap the “OK” button.
  • This method will vary based on the version of the latest Windows 10. You are required to disable and then turn on the feature to resume the service.
  • Now, check that the system is working and checking updates properly.
Removing the History of Windows Update
Sometimes, this error arises due to malfunctioning and corruption of temporary files that help to update any of your Windows. If the temporary files get corrupted, then it is advised to remove them from your device. Follow these steps to remove them:
  • First and foremost, tap the “Window” key and R tab on your keyboard to launch the Run dialog box on your screen.
  • After that, enter the keyword “services.msc,” followed by the enter key.
  • Then, apply the right mouse, click on the option “Windows Update.”
  • Now, tap on the “Stop” option.
  • After that, you have to launch Windows Explorer and then search for the following path:
“C:_Windows_folder.”
  • Then, search and remove the folders that are related to “Software Distribution.”
  • Now, return to the windows associated with the “Control Panel.”
  • Next, apply right click on the option “Windows Update Service.”
  • After that, hit the “Start” option.
  • Then, reboot your device.
  • Now, try to run the “Windows Update” option.
Updating RST Driver
This annoying error might also occur due to corrupted, missing, and outdated RST drivers. If you find your RST drivers corrupted, then it is recommended to upgrade it.
  • You can do it manually by visiting the official site of Intel and then manually update the driver.
  • You have to look for the updated and compatible driver that suits your device.
  • Make sure that the driver you are updating should not flash such error on your device.
Emily Johnson is a Microsoft product expert and has been working in the technology industry since 2002. As a technical expert, Emily has written technical blogs, manuals, white papers, and reviews for many websites such as office.com/setup.

How to Troubleshoot “Corrupted Mouse Driver” on Windows 10

Mouse Driver is one of the most important drivers that allows your mouse cursor to work smoothly on Windows 10. In this case, your device stops identifying your mouse, and it doesn’t depend on its model or type. It can attack both “Wireless” or “Non-wired” mice. 

Sometimes, users found that the display is showing yellow-colored “exclamation symbol” just after the icon of their mouse drivers. It might be the issue of your faulty or corrupted driver that is refusing to respond to your system.
There are various methods to check this issue: checking your connection properly, upgrading and reinstalling your driver. 
Follow these instructions to troubleshoot this driver issue:
  1. Checking “Mouse” Connectivity
For Wired Connections
It is recommended to check your mouse cables and its related connections to fix cord or connection related issues. 
If you wish to fix this issue by checking cables and connections, then abide by these instructions:
  1. Firstly, disconnect the cable from the port of your driver section located somewhere on your system.
  2. Now, connect it again to check that your USB ports are fine and working accordingly.
  3. Then check your cable whether it transmits the power or command through it or not.
  4. Now, make sure that it is properly attached to its compatible port.
For Wireless connections
  1. In case you are using a wireless mouse, then try to remove and then replace its battery.
  2. Now, abide by onscreen indications for managing connections and how to set up its settings. Then make sure that the issue is resolved successfully.
  3. Checking Mouse
If you are still facing mouse driver issues, then check your mouse properly and make sure that it is not bodily damaged. 
Then, take another working mouse and connect it to your system and check that it is working or not. If not, it means that your mouse’s physical condition is fine.
  • Modifying Mouse’s Properties
Sometimes, it happens that our mouse gets out of order or not in the functional state; in this case, it is recommended to use your keyboard to command your system instead of a mouse. 
Note: if you have the display that enables touchscreen, then you can handle your task by tapping various options via your display.
If you wish to access your mouse controls and actions by using the keyboard, then follow the under-mentioned steps:
  1. For the numeric keypad, press “Left Shift + Left Alt” and “Numlock” simultaneously to expand mouse keypad pop-out display.
  2. Then press on the “Yes” tab.
  3. Now, tap the “Window” logo and “I” keys altogether to launch the “Settings” page. It allows numerous setup options.
  4. After that, hit the “Tab” key from your keyboard and then navigate to the category “Devices” by using “Arrow” tabs.
  5. Now, hit the “Enter” key.
  6. Then, press on the “Tab” button to indicate and navigate to the option “Devices” with “Arrow” keys followed by “Enter.”
  7. After that, hit the “Tab” key and Downward arrow button to choose the “Mouse” option located at the left segment sidebar of the succeeding window.
  8. Then, go to the adjacent section of your page and keep pressing the tab key until you reach on the additional options for the mouse. 
  9. When you choose it, tap the “Enter” button to expand mouse-related properties.
  10. Navigate to the option “ELAN” through the “Tab” key.
  11. Choose your device and then tap the “Enter” key on the section “Enable Device.”
Emily Johnson is a creative person who has been writing blogs and articles about cybersecurity. He writes about the latest updates regarding mcafee.com/activate and how it can improve the work experience of users. His articles have been published in many popular e-magazines, blogs, and websites.

How to Fix Netflix Error tvq-st-103 on Windows 10

Netflix is a popular video streaming platform across the world. It provides various services like streaming movies, shows, dramas, and so on. However, it performs smooth streaming service for its users, but sometimes users reported various issues related to its streaming. They face not connecting, or network connection failed issues while working on Windows 10. Netflix issues display error alerts on the screen while users wish to stream their desired program or movie. Most often, it appears as “tvq st 103” error.

Sometimes, Windows flashes connection error or Unable to connect issues when it detects Netflix is not working issues properly. There are various reasons for arising this error code on Windows 10. One of them is the connection failure error for Netflix service.
Here, we are providing some necessary troubleshooting methods if you are facing Netflix error code tvq st 103 on Windows 10 screen.
 Reloading the Netflix Application
Once you detect error alert on your system screen, then it is recommended not to quit the window. Instead of this, you should choose the “More Details” option.
After that, hit the “Reload Netflix” tab located in the upcoming option.
Once the app reloads, then you have to launch the Netflix application once more to detect that the issue is properly removed. If not, then follow the next method:
Reinstalling Netflix Applications
In case you still encounter the same Netflix issue on Windows 10, then it is advised to uninstall and then install the app afresh.
You are required to delete your Netflix application as it might get corrupted or misbehaving with your device.
  • First and foremost, tap on the “Settings” option by navigating the Home screen.
  • Then, tap the “Applications” option.
  • After that, navigate to manage related options and search for the Netflix application from the available listing.
  • Once you view the application, hit the “Delete” option. You can also tap on “Uninstall” to delete the application from your device.
After that, it is recommended to install the application afresh. To do so, follow these instructions:
  • First and foremost, choose the option “Search” by navigating the home screen.
  • Then, enter “Netflix” in the provided space followed by the Enter key.
  • Locate the option “Free or Download” on the page. Once got it, tap on it to install the app.
  • Wait for a while for the downloading process to finish.
  • Once the installation and downloading complete, then launch the application and log in once more.
  • Finally, check your system that the error issue is fixed properly.
Fixing Netflix Error on PlayStation
In case you are using PlayStation and searching for the solutions for Error “tvq st 103” error issue, then pursue these instructions:
  • First of all, detect the issue by navigating the official website of “Netflix.com” on your device. It will run on a similar network.
  • In case the device screen displays an error message related to the Netflix site, then it means that your account refuses to sync with Netflix. In this case, it is recommended to wait for some time to launch it later.
  • If you are unable to view Website error related to Netflix, then follow the next method.
Ensure Network Supporting Streaming Service
  • In the case of institutions such as Restaurant, Office, Hotel, school, Hospital and any public Wi-Fi system, it is recommended to make sure that “Network Admin” is properly working or not.
  • Satellite Connection or any cellular data: Most of the tech enthusiasts recommend to use DSL: and cable-based networks to boost the internet speed as these are considered as slow connections.
Fixing Issue by Checking Internet Connectivity
  • Navigate to the main menu of PS3 and then hit the “Settings” option there. In case you already on that particular page, then tap and hold the “PS3” tab located at the central part of the controller.
  • Then, tap the Yes button and turn to the home page of your device after deciding to quit the program.
  • After that, select the option “Network Settings.”
  • Then, tap on the Internet Connection option.
Note: Make sure that the “enable” feature is turned ON. If you see the feature in deactivated mode, then it is recommended to activate it.
  • At last, select the option “Internet Connection Test” and check that the time and date is properly adjusted. Also, check that the internet connection is available on your device or not.
Emily Johnson is a creative person who has been writing blogs and articles about cybersecurity. He writes about the latest updates regarding mcafee.com/activate and how it can improve the work experience of users. His articles have been published in many popular e-magazines, blogs, and websites.

Thursday, February 20, 2020

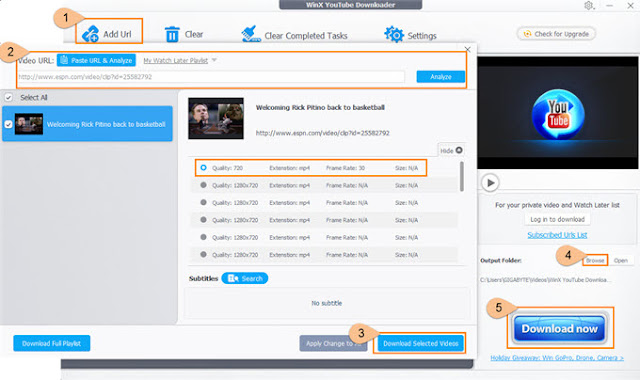
How to Download Embedded Videos from Any Website

YouTube is the second largest search engine of video searching after Google and you can find almost every video on the platform. 
You can get everything here be it entertainment-related, gaming videos, movies videos TV shows, etc. You may have wondered how to download videos available on the platform, and here we will help you out. Moreover, the blog will cover additional beneficial topics. Here is how to download embedded videos from any website.

1) How to Download Embedded Video on Safari
Adobe Flash itself is not supported because of its outdated and insecure technology, but the flash video downloader can work for several video formats.
The Flash video downloader option is great for Chrome and Firefox. You can download the Chrome version as well as the safari version for Apple Mac and Version for Mozilla Firefox.
It is the most trusted source for downloading the flash video on the rating 4.5 stars over 5600 reviews. If you want to download the flash video on your device, then you can download from lots of sites and source online.
It makes it easy to download and save the embedded video on your device. You can install Firefox, the small arrow locate on your screen, navigate it to the taskbar and click on the extension to save the videos. Remember that every flash video downloader not working on every website.
2) Chrome and Firefox Video Download Helper
In the year, 2007 Firefox release a Video DowloadHelper For its application Firefox. It is created with a chrome extension that made in the year 2015.
We know that Apple always updates their device and features regularly to work on any platform. The Mac version of the Apple device safari maintains its update to capability work on both platforms. Video DownloaderHelper has a long list of the website there, it works. One of the most or known sites is YouTube. It can contain lots of variety of content and hosting videos.
With the use of Video DownloaderHelper, you can save your favorite videos on the storage in any format according to your choice. This process is easy to use and in a simple way.
3) Free Video Downloader
Free video downloader is a part of Google chrome that work in every video website, and block that other website such as YouTube.
The free video downloader can support many types of files like WEBM, ASF, AVI, MP$, FLV, MOV, and MPG.
It supports multiple downloading videos at the same time. It can work with 99% + video performing websites. It can also support downloader video in the playlists.
4) Fastest YouTube Downloader Tools
YouTube and Fastest tube both need more installation and advance features to promote on Google chrome store.
 YouTube is a Google website, so it provides users a more convenient and easy way to update and download the videos from YouTube manually.
So it is easy to use and have a complete instruction provider to its user.
5) YouTube Video Downloader
YouTube video download is available for three platforms like Firefox, Mac, and Chrome. YouTube video downloader has many more options to quickly download the videos reliably.
Emily Johnson is a creative person who has been writing blogs and articles about cybersecurity. He writes about the latest updates regarding mcafee.com/activate and how it can improve the work experience of users. His articles have been published in many popular e-magazines, blogs, and websites.

How to Remove Todoist from Outlook

In this blog, we will teach you how you can disable and enable Todoist from your Outlook account. We will also discuss when disable and enable Todoist not work; you can reset your device. Here we discuss how to uninstall Todoist via Microsoft office. And separately from Outlook, and how you can disable Todoist on Apple Macbook and Windows.

Removing Todoist from Microsoft Office
Here are the steps on how to remove Todoist using Microsoft office:-
  1. Launch the Outlook application on your PC.
  2. Visit the File section.
  3. Please navigate to the option and tap on it.
  4. There you see Add-ins option that appears on the left of your screen.
  5. Select COM Add-Ins.
  6. Choose and tap on the Go option.
  7. Here a list appears on the screen the shown the list of Todoist add-in.
  8. If you wish to remove Todoist, tick to uncheck the box, to remove option.
  9. Now the tracking option appears tapping on OK option when you don’t want to do anything.
Remove Todoist Separately From Outlook
If you wish to remove your mail separately from WordPress, and Firefox, then you need to start this given program. Search the option plug-in and remove although this is not a direct way to uninstalling any Todoist from your Outlook account. In this blog, we teach you how to settings up with easy steps via traditional methods.
Here are steps on how to remove separately from Outlook:-
  1. In the additional method, you can switch off the Outlook program.
  2. Visit the Start and control tab.
  3. Tap on program and features.
  4. Tap on Uninstall icon that appears on your screen.
  5. You can also find it in the Windows search option.
  6. Windows Search option automatically uninstall it.
  7. After this process, you can reboot your computer.
  8. If can’t Todoist deleted by mistakes from your Outlook program, then you can’t recover for further use because Outlook has not a backup option.
  9. Remember that this is a proper way to execute the setting of Todoist.
  10. Remember that system restore setting is an excellent idea before uninstalling it.
Disable Todoist in Macbook and Windows
Here are the steps on how to disable Todoist in Macbook and Windows:-
  1. Launch the Outlook application.
  2. Visit file option, then tap on Add-Ins.
  3. It will appear on your device with the help of the internet, with any web browser.
  4. Visit the Manage Add-Ins, and search Turned On option.
  5. Here you find a tick near Todoist.
  6. Uncheck the box, to can’t delete Todoist.
  7. But it is disabled until when you do not enable it.
  8. Whenever you want to disable tick the uptick box, and the similar wish to disable it into your phone application.
  9. If you can’t search Todoist, then tap on Find more add-ins from the Outlook link.
The Easiest Solution is the Best Option
People always choose the easy option to solve their problems. Before starting any action like deleting, disabling and even restore your system, think it through. Most of the issue comes from incompatible software. If you are facing problem while deleting Todoist in the Outlook, then you can restart your device to fix this problem. This command will be running in the background of your device and still open it in Todoist.
Emily Johnson is a creative person who has been writing blogs and articles about cybersecurity. He writes about the latest updates regarding mcafee.com/activate and how it can improve the work experience of users. His articles have been published in many popular e-magazines, blogs, and websites.

Tuesday, February 18, 2020

How to Use iPhone as a Webcam

If you have decided to purchase a webcam, you may think about it again as an iPhone is always there for that purpose. However, going for the worthy device will always be the better option if you have not decided to use it more often so that it does not end up lying somewhere in your cupboard. Using the iPhone as a webcam is a great method to go for a chat. It is also handy if the integrated camera of the laptop does not offer the comforting level of the video quality. If you need to know about it, then you are in the right post. Read through the blog and follow the instructions to use the iPhone as webcam.

Converting iPhone Into Webcam
It does not require a lot of effort to convert the iPhone into a webcam. You have to download the app to the iPhone to connect it to the PC.
If you want to convert iPhone into a webcam, then you can follow the provided steps:
  1. Ensure that both iPhone and PC are on a similar Wi-Fi network. According to the app, it may be sufficient to link them to the internet service that you are using.
  2. Install the app which converts the iPhone into a webcam.
  3. Install the app driver to the PC.
  4. Begin the webcam app on iPhone.
  5. Begin the chat app to the PC that uses a webcam, including Skype.
  6. Choose the iPhone as the source in the chat app webcam choice. It is so simple, and mostly you have to link the device to the PC with a cable.
If you think that webcam application to use, then the most versatile apps are iCamSource or EpocCam pro mobile.
Epoccam
The most famous webcam apps, EpocCam permits to use the rear and front cameras on iPhone. You can use several apps that use a camera, and it is accessible for both Android and iOS devices.
To customize on the PC, navigate to the developer’s site and then download the drivers from the home page. There is also a paid version of the mobile app, which is dubbed like Pro. It allows you to advance video 640×480 to 1920×1080 HD resolution. It allows us to connect the iPhone to the PC via USB cable to permit better stable streaming. If you have a green screen for the broadcast, the Pro version will cover it all.
iCamSource Pro Mobile
This application can make the iPhone better than ordinary webcam including several extra features. The device camera and the microphone can also become a monitoring tool via iCamSource Pro Mobile. It may identify motion then begin recording video and audio automatically. You may configure the app via trigger to send a notification every time there is any motion in the field of view in iPhone which allows using the device as the baby monitor, security camera or pet cam. This app charges $4.99, and no version is accessible for free.  However, there is another app available for you to install named as iCam Pro Webcam. It is for free or mixes with iCamSource Pro Mobile that allows to stream video or audio from iOS phone.
No Webcam Required
When you do not have a webcam, or you want to place the old iPhone in better use, then these apps can help. Though several apps offer a similar feature so ensure to check it out. You may begin with  IP Cam, Presence, WebCamera, iVCam, and FaceTime.
Emily Johnson is a creative person who has been writing blogs and articles about cybersecurity. He writes about the latest updates regarding mcafee.com/activate and how it can improve the work experience of users. His articles have been published in many popular e-magazines, blogs, and websites.
Galaxy Z Flip: 7 Features You Must Try -Out

Samsung’s new foldable smartphone is now out, and it has some very cool features that you know about no matter you wish to buy it or not. Its split-screen feature is not an innovation, but it seems pretty efficient in its foldable screen since the two apps will appear on its both flaps. You could open YouTube on the upper one and in the lower one you can browser something else simultaneously. On 14 Feb, Samsung’s innovative Galaxy Z Flip launched in the market, and it went officially on sale. Last week another foldable smartphone launched by Motorola known as Razr and the Moto new foldable innovation is now trending too rapidly. Now that Samsung also launched the same foldable technology, customers who are interested in the tech can choose from these two options. In this article, you will learn 7 insanely innovative features of all-new Galaxy Z Flip. Let’s dive in.  

Top 7 Features of Galaxy Z Flip  
Here are the cool new features that you must know about this ground-breaking device:
1. Use Fingerprint Sensor as a Scroll Wheel on Galaxy Z Flip
As being an Android operated device, Z flip is a highly customizable smartphone in which you can use the fingerprint sensor as a scroll wheel by just tweaking your device settings. By making your fingerprint sensor as a scroll wheel, one can easily pull down the notification bar while only using one hand and you can easily navigate throughout the phone. Here is how to enable the Galaxy Z flip fingerprint sensor as a scroll wheel:
  1. Head to Settings.
  2. Navigate to Advanced Features.
  3. Press on Motion and Gestures.  
  4. Find the finger sensor gestures option and then press on the toggle button located next to it to turn it on.  
Now to use it, unlock your phone, to open the Android notification panel, move your finger from the top to down on your fingerprint sensor. To open the Control Panel, make sure to repeat the above procedure twice. To close the notification panel or the Control panel, draw your finger downward to upward direction on the fingerprint sensor.
2. Use the Power key to Take Selfie
While the phone is closed, users can tap the power key twice to trigger the rear camera to take a selfie. You will see a live preview on the 1.1-inch tiny screen and capture the photo, press either volume key or raise your palm to start the camera countdown.  
3. Learn the Tiny Outer Screen
Besides the fact that the new foldable smartphone can take selfies as well as show the live preview on the tiny while the smartphone is entirely closed, that small display has other features too. When you press the power key, it will display Time, Date and the remaining battery status. This little display is a full-fledged touchscreen that allows you to swipe your fingers across it to trigger many other cool things. For instance, by swiping your fingers from left to right on the screen, you can see the short notifications. You can also open a particular notification on the same screen by tapping on the present icons. While charging, it will show the charging progress in percentage and even the predicted time to complete the charging.
4. Flex Mode: Use Z Flip as a Miniature Laptop
Samsung has designed this phone in such a way that its turning point is firm enough to remain steady in any degree. You can even keep it foldable in a 90-degree angle and then use it as a laptop. When you open YouTube while keeping the Flex mode active, the video will play on the upper portion, and the comments would appear on the lower pane.   
Flex Mode Other Features:
  • Video calls with Google Duo.
  • While you browse your images in Gallery, the pictures would appear on the upper screen and the lower screen will remain blank and will be used as a touchpad.  
  • Hands-free selfies.  
  • Fold the phone to 90 degrees and then take photos and videos just like you do while connected to a tripod.
5. Split-Screen Apps
The Split screen feature works like a miracle in this 6.7-inch screen foldable phone; here is how to use the split-screen on Samsung Galaxy Z Flip:
  1. Open your phone, draw your finger upward on your phone screen to trigger the recently opened apps. Alternatively, head to the navigator bar and then press on recent apps icon.
  2. Now tap on the app that you want to open on the top screen and then tap and hold down the app icon.
  3. Next, a new menu would show up.
  4. Press on Open in the split-screen view.
  5. Then head to the second app that you want to open on the lower panel.  
  6. Now the split-screen mode will be enabled on your device.
  7. You can even use the divider scale to adjust each screen size.
6. One-Handed Use Gestures
When you enable Gestures in your Galaxy Z Flip, it becomes effortless to use it with one hand. To enable gestures, see these details:
  1. Navigate to Settings.
  2. Head to Display.
  3. Press on Navigate Bar.
  4. Select the Full-Screen gestures option.
  5. Now swipe up on your screen to head to Home, swipe up and hold down your finger on the screen to view recent apps. Swipe left or right to go back.
 7. 4 Months Free Subscription to YouTube Premium
The Z Flip comes along with four months free subscription of YouTube Premium and to claim it, see these instructions:
  1. Head to YouTube.
  2. Navigate to the Profile icon.  
  3. Choose YouTube Premium.
  4. Press on Try it Free.
  5. Provide credit card details.
Emily Johnson is a Microsoft product expert and has been working in the technology industry since 2002. As a technical expert, Emily has written technical blogs, manuals, white papers, and reviews for many websites such as office.com/setup.

How to Modify the Default Font on Microsoft Word?

When you open a new blank document in MS Word, you can see that the app automatically set to ‘Calibri’ or ‘Times New Roman’ languages font...